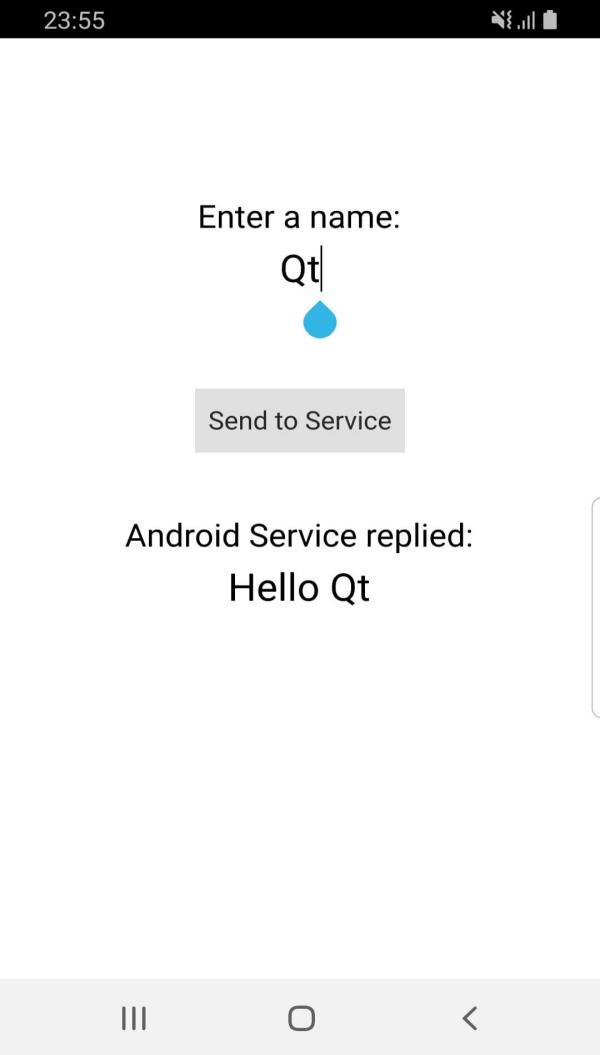
Demonstrates how to run an Android service in a separate process using a separate .so lib file, and how to communicate with Qt using a BroadcastReceiver.

This example demonstrates how to create and run an Android service in a separate process that uses a separate
.so
lib file, and then exchange data between QML/C++ and the Java service using a
BroadcastReceiver
.
When clicking the
Send to Service
button, the name entered in the QML view, Qt, in this case, is sent to the Android service. Then, the service replies back with a message
Hello Qt
which is printed in the QML view.
要运行范例从 Qt Creator ,打开 欢迎 模式,然后选择范例从 范例 。更多信息,拜访 构建和运行范例 .
When running the app's process, you can extend either
QtService
or
Service
. Extending
QtService
allows Qt to load all the necessary libraries to load Qt components correctly and call native methods on Android. However, here the service is running in the same process, and with the BroadcastReceiver you don't need native calls to exchange messages with Qt, so extending either class works.
Start by creating the Java service class. This is a normal Android
Service
that receives a name from QML and replies back with
Hello <name>
:
package org.qtproject.example.qtandroidservice;
import android.content.Context;
import android.content.Intent;
import android.util.Log;
import android.os.IBinder;
import org.qtproject.qt5.android.bindings.QtService;
import android.content.IntentFilter;
public class QtAndroidService extends QtService
{
    private static final String TAG = "QtAndroidService";
    @Override
    public void onCreate() {
        super.onCreate();
        Log.i(TAG, "Creating Service");
    }
    @Override
    public void onDestroy() {
        super.onDestroy();
        Log.i(TAG, "Destroying Service");
    }
    @Override
    public int onStartCommand(Intent intent, int flags, int startId) {
        int ret = super.onStartCommand(intent, flags, startId);
        String name = new String(intent.getByteArrayExtra("name"));
        Intent sendToUiIntent = new Intent();
        sendToUiIntent.setAction(ActivityUtils.BROADCAST_NAME_ACTION);
        sendToUiIntent.putExtra("name", name);
        Log.i(TAG, "Service sending broadcast");
        sendBroadcast(sendToUiIntent);
        return ret;
    }
    @Override
    public IBinder onBind(Intent intent) {
        return super.onBind(intent);
    }
}
In the owerwritten method
onStartCommand()
, the service receives a name from the calling intent, then sends a broadcast to the BroadcastReceiver, which in turn will call the native method
sendToQt(String message)
. For more information on managing native calls in Qt, see
Calling QML/C++ Functions from Java Code
.
Since the service is run on a separate
.so
lib file, you must create a sub-project for the service process which uses
QAndroidService
. Start with a
.pro
file as follows:
TEMPLATE = lib
TARGET = service
CONFIG += dll
QT += core androidextras
SOURCES += \
    service_main.cpp
Then, create the file
service_main.cpp
:
#include <QDebug>
#include <QAndroidService>
int main(int argc, char *argv[])
{
    qWarning() << "Service starting with BroadcastReceiver from separate .so file";
    QAndroidService app(argc, argv);
    return app.exec();
}
To use the service, it must be declared in the
AndroidManifest.xml
文件:
<service android:process=":qt_service" android:name=".QtAndroidService">
        <meta-data android:name="android.app.lib_name" android:value="service"/>
        <meta-data android:name="android.app.qt_sources_resource_id" android:resource="@array/qt_sources"/>
        <meta-data android:name="android.app.repository" android:value="default"/>
        <meta-data android:name="android.app.qt_libs_resource_id" android:resource="@array/qt_libs"/>
        <meta-data android:name="android.app.bundled_libs_resource_id" android:resource="@array/bundled_libs"/>
        <!-- Deploy Qt libs as part of package -->
        <meta-data android:name="android.app.bundle_local_qt_libs" android:value="-- %%BUNDLE_LOCAL_QT_LIBS%% --"/>
        <!-- Run with local libs -->
        <meta-data android:name="android.app.use_local_qt_libs" android:value="-- %%USE_LOCAL_QT_LIBS%% --"/>
        <meta-data android:name="android.app.libs_prefix" android:value="/data/local/tmp/qt/"/>
        <meta-data android:name="android.app.load_local_libs_resource_id" android:resource="@array/load_local_libs"/>
        <meta-data android:name="android.app.load_local_jars" android:value="-- %%INSERT_LOCAL_JARS%% --"/>
        <meta-data android:name="android.app.static_init_classes" android:value="-- %%INSERT_INIT_CLASSES%% --"/>
        <!-- Run with local libs -->
        <!-- Background running -->
        <meta-data android:name="android.app.background_running" android:value="true"/>
        <!-- Background running -->
    </service>
Take the following steps to set up and start the service:
package org.qtproject.example.qtandroidservice;
import android.content.Context;
import android.content.Intent;
import android.util.Log;
import android.content.BroadcastReceiver;
import android.content.IntentFilter;
public class ActivityUtils {
    private static native void sendToQt(String message);
    private static final String TAG = "ActivityUtils";
    public static final String BROADCAST_NAME_ACTION = "org.qtproject.example.qtandroidservice.broadcast.name";
    public void registerServiceBroadcastReceiver(Context context) {
        IntentFilter intentFilter = new IntentFilter();
        intentFilter.addAction(BROADCAST_NAME_ACTION);
        context.registerReceiver(serviceMessageReceiver, intentFilter);
        Log.i(TAG, "Registered broadcast receiver");
    }
    private BroadcastReceiver serviceMessageReceiver = new BroadcastReceiver() {
        @Override
        public void onReceive(Context context, Intent intent) {
            Log.i(TAG, "In OnReceive broadcast receiver");
            if (BROADCAST_NAME_ACTION.equals(intent.getAction())) {
                String name = intent.getStringExtra("name");
                Log.i(TAG, "Service received name: " + name);
                String message = "Hello " + name;
                sendToQt(message);
                Log.i(TAG, "Service sent back message: " + message);
            }
        }
    };
}
void QtAndroidService::registerBroadcastReceiver()
{
    QAndroidJniEnvironment env;
    jclass javaClass = env.findClass("org/qtproject/example/qtandroidservice/ActivityUtils");
    QAndroidJniObject classObject(javaClass);
    classObject.callMethod<void>("registerServiceBroadcastReceiver",
                                 "(Landroid/content/Context;)V",
                                 QtAndroid::androidContext().object());
}
void QtAndroidService::sendToService(const QString &name)
{
    QAndroidIntent serviceIntent(QtAndroid::androidActivity().object(),
                                "org/qtproject/example/qtandroidservice/QtAndroidService");
    serviceIntent.putExtra("name", name.toUtf8());
    QAndroidJniObject result = QtAndroid::androidActivity().callObjectMethod(
                "startService",
                "(Landroid/content/Intent;)Landroid/content/ComponentName;",
                serviceIntent.handle().object());
}
This function is used to start the Service. If the service is already running, it will only send the names without starting a new service instance.
另请参阅 Android Service with BroadcastReceiver - Same Lib File , Android 服务 , Qt for Android ,和 Qt Android Extras .