Describes how to code the user interface of the Address Book Example. This first part covers the design of the basic graphical user interface (GUI) for our address book application.
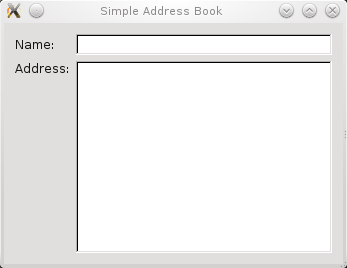
The first step in creating a GUI program is to design the user interface. Here the our goal is to set up the labels and input fields to implement a basic address book. The figure below is a screenshot of the expected output.

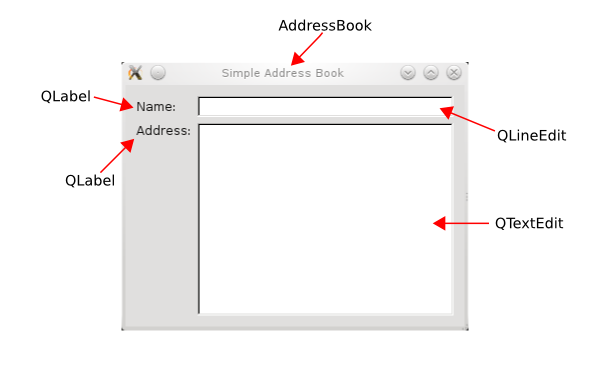
We require two
QLabel
对象,
nameLabel
and
addressLabel
, as well as two input fields, a
QLineEdit
对象,
nameLine
,和
QTextEdit
对象,
addressText
, to enable the user to enter a contact's name and address. The widgets used and their positions are shown in the figure below.

There are three files used to implement this address book:
addressbook.h
- the definition file for the
AddressBook
class,
addressbook.cpp
- the implementation file for the
AddressBook
class, and
main.cpp
- the file containing a
main()
function, with an instance of
AddressBook
.
When writing Qt programs, we usually subclass Qt objects to add functionality. This is one of the essential concepts behind creating custom widgets or collections of standard widgets. Subclassing to extend or change the behavior of a widget has the following advantages:
Since Qt does not provide a specific address book widget, we subclass a standard Qt widget class and add features to it. The
AddressBook
class we create in this tutorial can be reused in situations where a basic address book widget is needed.
The
tutorials/addressbook/part1/addressbook.h
file is used to define the
AddressBook
类。
We start by defining
AddressBook
作为
QWidget
subclass and declaring a constructor. We also use the
Q_OBJECT
macro to indicate that the class uses internationalization and Qt's signals and slots features, even if we do not use all of these features at this stage.
class AddressBook : public QWidget
{
    Q_OBJECT
public:
    AddressBook(QWidget *parent = nullptr);
private:
    QLineEdit *nameLine;
    QTextEdit *addressText;
};
The class holds declarations of
nameLine
and
addressText
, the private instances of
QLineEdit
and
QTextEdit
mentioned earlier. The data stored in
nameLine
and
addressText
will be needed for many of the address book functions.
We don't include declarations of the QLabel objects we will use because we will not need to reference them once they have been created. The way Qt tracks the ownership of objects is explained in the next section.
The Q_OBJECT macro itself implements some of the more advanced features of Qt. For now, it is useful to think of the Q_OBJECT macro as a shortcut which allows us to use the tr() and connect() 函数。
We have now completed the
addressbook.h
file and we move on to implement the corresponding
addressbook.cpp
文件。
The constructor of
AddressBook
accepts a
QWidget
参数,
parent
. By convention, we pass this parameter to the base class's constructor. This concept of ownership, where a parent can have one or more children, is useful for grouping widgets in Qt. For example, if you delete a parent, all of its children will be deleted as well.
AddressBook::AddressBook(QWidget *parent)
    : QWidget(parent)
{
    QLabel *nameLabel = new QLabel(tr("Name:"));
    nameLine = new QLineEdit;
    QLabel *addressLabel = new QLabel(tr("Address:"));
    addressText = new QTextEdit;
In this constructor, the
QLabel
对象
nameLabel
and
addressLabel
are instantiated, as well as
nameLine
and
addressText
。
tr()
function returns a translated version of the string, if there is one available. Otherwise it returns the string itself. This function marks its
QString
parameter as one that should be translated into other languages. It should be used wherever a translatable string appears.
When programming with Qt, it is useful to know how layouts work. Qt provides three main layout classes: QHBoxLayout , QVBoxLayout and QGridLayout to handle the positioning of widgets.

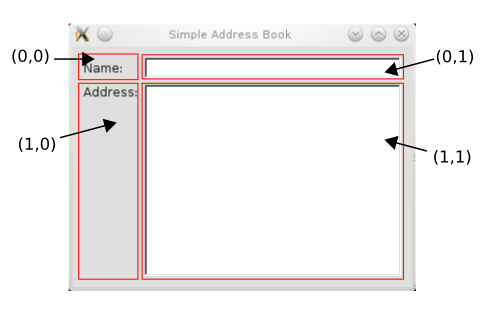
使用 QGridLayout to position our labels and input fields in a structured manner. QGridLayout divides the available space into a grid and places widgets in the cells we specify with row and column numbers. The diagram above shows the layout cells and the position of our widgets, and we specify this arrangement using the following code:
    QGridLayout *mainLayout = new QGridLayout;
    mainLayout->addWidget(nameLabel, 0, 0);
    mainLayout->addWidget(nameLine, 0, 1);
    mainLayout->addWidget(addressLabel, 1, 0, Qt::AlignTop);
    mainLayout->addWidget(addressText, 1, 1);
预告
addressLabel
is positioned using
Qt::AlignTop
as an additional argument. This is to make sure it is not vertically centered in cell (1,0). For a basic overview on Qt Layouts, refer to the
布局管理
文档编制。
In order to install the layout object onto the widget, we have to invoke the widget's setLayout() 函数:
    setLayout(mainLayout);
    setWindowTitle(tr("Simple Address Book"));
}
Lastly, we set the widget's title to "Simple Address Book".
A separate file,
main.cpp
, is used for the
main()
function. Within this function, we instantiate a
QApplication
对象,
app
.
QApplication
is responsible for various application-wide resources, such as the default font and cursor, and for running an event loop. Hence, there is always one
QApplication
object in every GUI application using Qt.
int main(int argc, char *argv[])
{
    QApplication app(argc, argv);
    AddressBook addressBook;
    addressBook.show();
    return app.exec();
}
We construct a new
AddressBook
widget on the stack and invoke its
show()
function to display it. However, the widget will not be shown until the application's event loop is started. We start the event loop by calling the application's
exec()
function; the result returned by this function is used as the return value from the
main()
function. At this point, it becomes apparent why we instanciated
AddressBook
on the stack: It will now go out of scope. Therefore,
AddressBook
and all its child widgets will be deleted, thus preventing memory leaks.