QML Video demonstrates the various transformations (move; resize; rotate; change aspect ratio) that can be applied to QML VideoOutput and Camera 类型。
It also shows how native code can be combined with QML to implement more advanced functionality - in this case, C++ code is used to calculate the QML frame rate. This value is rendered in QML in a semi-transparent item overlaid on the video content.
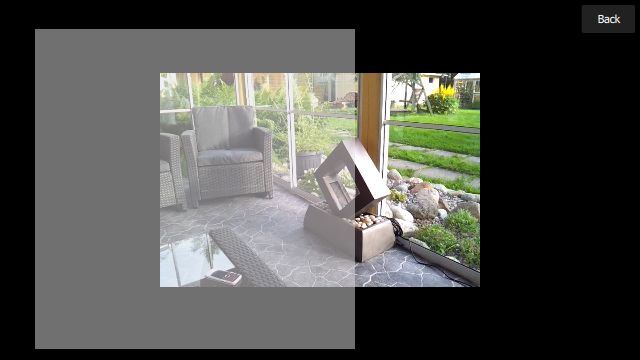
The following image shows the application executing the video-overlay scene, which creates a dummy overlay item (just a semi-transparent Rectangle ), which moves across the VideoOutput 项。
要运行范例从 Qt Creator ,打开 欢迎 模式,然后选择范例从 范例 。更多信息,拜访 构建和运行范例 .
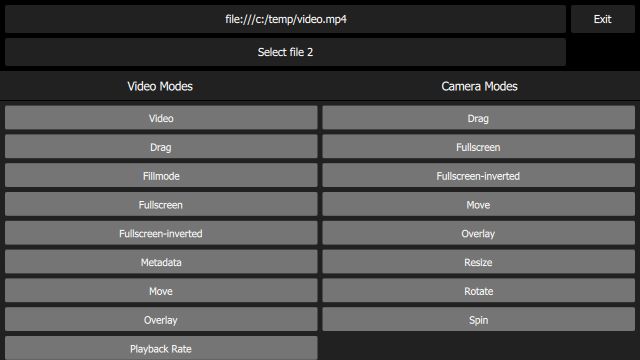
The multimedia/video/qmlvideo/qml/qmlvideo/main.qml file creates a UI which includes the following items:
Each scene in the flickable list is implemented in its own QML file - for example the video-basic scene (which just displays a static VideoOutput in the center of the screen) is implemented in the VideoBasic.qml file. As you can see from the code, this makes use of a type of inheritance: a VideoBasic item ...
import QtQuick 2.0
SceneBasic {
    contentType: "video"
}
... is-a SceneBasic ...
import QtQuick 2.0
Scene {
    id: root
    property string contentType
    ...
    Content {
        id: content
    ...
    }
    Text {
        anchors {
            horizontalCenter: parent.horizontalCenter
            bottom: parent.bottom
            margins: 20
        }
        text: content.started ? "Tap the screen to stop content"
                              : "Tap the screen to start content"
        color: "#e0e0e0"
        z: 2.0
    }
    MouseArea {
        anchors.fill: parent
        onClicked: {
            if (content.started)
                content.stop()
            else
                content.start()
        }
    }
    Component.onCompleted: root.content = content
}
... which is-a Scene :
import QtQuick 2.0
Rectangle {
    id: root
    ...
    property QtObject content
    ...
    Button {
        id: closeButton
        anchors {
            top: parent.top
            right: parent.right
            margins: root.margins
        }
        width: Math.max(parent.width, parent.height) / 12
        height: Math.min(parent.width, parent.height) / 12
        z: 2.0
        bgColor: "#212121"
        bgColorSelected: "#757575"
        textColorSelected: "white"
        text: "Back"
        onClicked: root.close()
    }
}
SceneBasic describes the structure and behaviour of the scene, but is agnostic of the type of content which will be displayed - this is abstracted by 内容 .
This pattern allows us to define a particular use case (in this case, simply display a static piece of content), and then instantiate that use case for both video content ( VideoBasic ) and camera content ( CameraBasic ). This approach is used to implement many of the other scenes - for example, "repeatedly slide the content from left to right and back again" is implemented by SceneMove , on which VideoMove and CameraMove are based.
Depending on the value of the contentType property in the top-level scene instance, the embedded 内容 item creates either a MediaPlayer 或 Camera 项。
The QML painting rate is calculated by the FrequencyMonitor class, which turns a stream of events (received via the notify() slot), into an instantaneous and an averaged frequency:
class FrequencyMonitor : public QObject
{
    Q_OBJECT
    Q_PROPERTY(qreal instantaneousFrequency READ instantaneousFrequency NOTIFY instantaneousFrequencyChanged)
    Q_PROPERTY(qreal averageFrequency READ averageFrequency NOTIFY averageFrequencyChanged)
public:
    ...
    static void qmlRegisterType();
public slots:
    Q_INVOKABLE void notify();
};
The FrequencyMonitor class is exposed to QML like this
void FrequencyMonitor::qmlRegisterType()
{
    ::qmlRegisterType<FrequencyMonitor>("FrequencyMonitor", 1, 0, "FrequencyMonitor");
}
and its data is displayed by defining a QML item called FrequencyItem, like this:
import FrequencyMonitor 1.0
Rectangle {
    id: root
    ...
    function notify() {
        monitor.notify()
    }
    FrequencyMonitor {
        id: monitor
        onAverageFrequencyChanged: {
            averageFrequencyText.text = monitor.averageFrequency.toFixed(2)
        }
    }
    Text {
        id: labelText
        anchors {
            left: parent.left
            top: parent.top
            margins: 10
        }
        color: root.textColor
        font.pixelSize: 0.6 * root.textSize
        text: root.label
        width: root.width - 2*anchors.margins
        elide: Text.ElideRight
    }
    Text {
        id: averageFrequencyText
        anchors {
            right: parent.right
            bottom: parent.bottom
            margins: 10
        }
        color: root.textColor
        font.pixelSize: root.textSize
    }
}
The result looks like this:

All that remains is to connect the afterRendering() signal of the QQuickView object to a JavaScript function, which will eventually call frequencyItem.notify():
#include <QtGui/QGuiApplication>
#include <QtQuick/QQuickItem>
#include <QtQuick/QQuickView>
#include "trace.h"
#ifdef PERFORMANCEMONITOR_SUPPORT
#include "performancemonitordeclarative.h"
#endif
static const QString DefaultFileName1 = "";
    ...
    QQuickItem *rootObject = viewer.rootObject();
    ...
    QObject::connect(&viewer, SIGNAL(afterRendering()),
                     rootObject, SLOT(qmlFramePainted()));
文件:
图像: