Qt Designer UI 文件以 XML 格式表示 Widget 表单树。表单可以被处理:
创建用户界面组件采用 Qt Designer 和使用 Qt 集成构建工具, qmake and uic ,当构建应用程序时为它们生成代码。生成代码包含表单用户界面对象。它是 C++ 结构,包含:
setupUi()
以在父级 Widget 构建小部件树。
retranslateUi()
处理表单字符串特性的翻译。更多信息,见
应对语言变化
.
生成代码可以包括在应用程序中且能直接使用。另外,可以使用它来扩展标准 Widget 的子类。
编译时处理表单可以按下列方法之一用于应用程序:
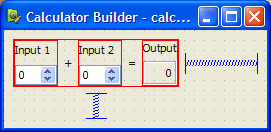
为演示,我们创建简单 Calculator Form 应用程序。基于原始 计算器表单 范例。
应用程序的组成由一源文件,
main.cpp
和 UI 文件。
The
calculatorform.ui
文件设计采用
Qt Designer
展示如下:
将使用
qmake
to build the executable, so we need to write a
.pro
文件:
HEADERS = calculatorform.h
此文件的特殊特征是
FORMS
声明,告诉
qmake
要处理文件采用
uic
。在此情况下,
calculatorform.ui
文件被用来创建
ui_calculatorform.h
文件,可以用于的任何文件列出在
SOURCES
声明。
注意: You can use Qt Creator to create the Calculator Form project. It automatically generates the main.cpp, UI, and .pro files, which you can then modify.
为以直接方式使用,包括
ui_calculatorform.h
文件直接在
main.cpp
:
#include "ui_calculatorform.h"
The
main
函数创建 Calculator 小部件通过构造标准
QWidget
用于托管用户界面描述通过
calculatorform.ui
文件。
int main(int argc, char *argv[])
{
    QApplication app(argc, argv);
    QWidget *widget = new QWidget;
    Ui::CalculatorForm ui;
    ui.setupUi(widget);
    widget->show();
    return app.exec();
}
在此情况下,
Ui::CalculatorForm
是界面描述对象来自
ui_calculatorform.h
文件,设置所有对话框的 Widget 和在其信号与槽之间的连接。
The direct approach provides a quick and easy way to use simple, self-contained components in your applications. However, componens created with
Qt Designer
often require close integration with the rest of the application code. For instance, the
CalculatorForm
code provided above will compile and run, but the
QSpinBox
objects will not interact with the
QLabel
as we need a custom slot to carry out the add operation and display the result in the
QLabel
. To achieve this, we need to use the single inheritance approach.
为以单继承方式使用,子类标准 Qt 小部件,并包括表单用户界面对象的私有实例。
In this approach, we subclass a Qt widget and set up the user interface from within the constructor. Components used in this way expose the widgets and layouts used in the form to the Qt widget subclass, and provide a standard system for making signal and slot connections between the user interface and other objects in your application. The generated
Ui::CalculatorForm
structure is a member of the class.
This approach is used in the 计算器表单 范例。
To ensure that we can use the user interface, we need to include the header file that
uic
generates before referring to
Ui::CalculatorForm
:
#include "ui_calculatorform.h"
This means that the
.pro
file must be updated to include
calculatorform.h
:
HEADERS = calculatorform.h
按以下方式定义子类:
class CalculatorForm : public QWidget
{
    Q_OBJECT
public:
    explicit CalculatorForm(QWidget *parent = nullptr);
private slots:
    void on_inputSpinBox1_valueChanged(int value);
    void on_inputSpinBox2_valueChanged(int value);
private:
    Ui::CalculatorForm ui;
};
The important feature of the class is the private
ui
object which provides the code for setting up and managing the user interface.
The constructor for the subclass constructs and configures all the widgets and layouts for the dialog just by calling the
ui
对象的
setupUi()
function. Once this has been done, it is possible to modify the user interface as needed.
CalculatorForm::CalculatorForm(QWidget *parent)
    : QWidget(parent)
{
    ui.setupUi(this);
}
We can connect signals and slots in user interface widgets in the usual way by adding the on_<object name> - prefix. For more information, see widgets-and-dialogs-with-auto-connect .
The advantages of this approach are its simple use of inheritance to provide a
QWidget
-based interface, and its encapsulation of the user interface widget variables within the
ui
data member. We can use this method to define a number of user interfaces within the same widget, each of which is contained within its own namespace, and overlay (or compose) them. This approach can be used to create individual tabs from existing forms, for example.
另外,
Ui::CalculatorForm
structure can be made a pointer member of the class. The header then looks as follows:
namespace Ui {
    class CalculatorForm;
}
class CalculatorForm : public QWidget
...
virtual ~CalculatorForm();
...
private:
    Ui::CalculatorForm *ui;
...
相应源文件看起来如下:
#include "ui_calculatorform.h"
CalculatorForm::CalculatorForm(QWidget *parent) :
    QWidget(parent), ui(new Ui::CalculatorForm)
{
    ui->setupUi(this);
}
CalculatorForm::~CalculatorForm()
{
    delete ui;
}
The advantage of this approach is that the user interface object can be forward-declared, which means that we do not have to include the generated
ui_calculatorform.h
file in the header. The form can then be changed without recompiling the dependent source files. This is particularly important if the class is subject to binary compatibility restrictions.
We generally recommend this approach for libraries and large applications. For more information, see 创建共享库 .
表单创建采用 Qt Designer 可以子类化在一起采用标准 QWidget 基类。 此方式制作由表单定义的所有用户界面组件 (可在子类作用域内直接访问),并启用信号和槽连接按通常方式采用 connect() 函数。
This approach is used in the Multiple Inheritance 范例。
需要包括头文件由
uic
生成自
calculatorform.ui
文件,如下:
#include "ui_calculatorform.h"
The class is defined in a similar way to the one used in the
单继承方式
, except that this time we inherit from
both
QWidget
and
Ui::CalculatorForm
,如下:
class CalculatorForm : public QWidget, private Ui::CalculatorForm
{
    Q_OBJECT
public:
    explicit CalculatorForm(QWidget *parent = nullptr);
private slots:
    void on_inputSpinBox1_valueChanged(int value);
    void on_inputSpinBox2_valueChanged(int value);
};
继承
Ui::CalculatorForm
privately to ensure that the user interface objects are private in our subclass. We can also inherit it with the
public
or
protected
keywords in the same way that we could have made
ui
public or protected in the previous case.
The constructor for the subclass performs many of the same tasks as the constructor used in the 单继承 范例:
CalculatorForm::CalculatorForm(QWidget *parent)
    : QWidget(parent)
{
    setupUi(this);
}
In this case, the widgets used in the user interface can be accessed in the same say as a widget created in code by hand. We no longer require the
ui
prefix to access them.
Qt 通知应用程序,若用户界面语言变化通过发送事件类型
QEvent::LanguageChange
。要调用成员函数
retranslateUi()
对于用户界面对象,重实现
QWidget::changeEvent()
在表单类中,如下所示:
void CalculatorForm::changeEvent(QEvent *e)
{
    QWidget::changeEvent(e);
    switch (e->type()) {
    case QEvent::LanguageChange:
        ui->retranslateUi(this);
        break;
    default:
        break;
   }
}
另外,可以在运行时处理表单,产生动态生成用户界面。这的完成可以使用 QtUiTools 模块提供 QUiLoader 类以处理表单创建采用 Qt Designer .
A resource file containing a UI file is required to process forms at run time. Also, the application needs to be configured to use the
QtUiTools
module. This is done by including the following declaration in a
qmake
project file, ensuring that the application is compiled and linked appropriately.
QT += uitools
The QUiLoader class provides a form loader object to construct the user interface. This user interface can be retrieved from any QIODevice ,如 QFile object, to obtain a form stored in a project's resource file. The QUiLoader::load () 函数使用文件中包含的用户界面描述构造表单 Widget。
The QtUiTools 模块类可以被包括使用以下指令:
#include <QtUiTools>
The QUiLoader::load () 函数的援引如此代码所展示的来自 文本查找器 范例:
static QWidget *loadUiFile(QWidget *parent)
{
    QFile file(":/forms/textfinder.ui");
    file.open(QIODevice::ReadOnly);
    QUiLoader loader;
    return loader.load(&file, parent);
}
In a class that uses QtUiTools to build its user interface at run time, we can locate objects in the form using QObject::findChild (). For example, in the following code, we locate some components based on their object names and widget types:
    ui_findButton = findChild<QPushButton*>("findButton");
    ui_textEdit = findChild<QTextEdit*>("textEdit");
    ui_lineEdit = findChild<QLineEdit*>("lineEdit");
Processing forms at run-time gives the developer the freedom to change a program's user interface, just by changing the UI file. This is useful when customizing programs to suit various user needs, such as extra large icons or a different colour scheme for accessibility support.
The signals and slots connections defined for compile time or run time forms can either be set up manually or automatically, using QMetaObject 's ability to make connections between signals and suitably-named slots.
Generally, in a QDialog , if we want to process the information entered by the user before accepting it, we need to connect the clicked() signal from the OK button to a custom slot in our dialog. We will first show an example of the dialog in which the slot is connected by hand then compare it with a dialog that uses automatic connection.
We define the dialog in the same way as before, but now include a slot in addition to the constructor:
class ImageDialog : public QDialog, private Ui::ImageDialog
{
    Q_OBJECT
public:
    ImageDialog(QWidget *parent = 0);
private slots:
    void checkValues();
};
The
checkValues()
slot will be used to validate the values provided by the user.
In the dialog's constructor we set up the widgets as before, and connect the Cancel 按钮的 clicked() signal to the dialog's reject() slot. We also disable the autoDefault property in both buttons to ensure that the dialog does not interfere with the way that the line edit handles return key events:
ImageDialog::ImageDialog(QWidget *parent)
    : QDialog(parent)
{
    setupUi(this);
    okButton->setAutoDefault(false);
    cancelButton->setAutoDefault(false);
    ...
    connect(okButton, SIGNAL(clicked()), this, SLOT(checkValues()));
}
连接 OK 按钮的 clicked() signal to the dialog's checkValues() slot which we implement as follows:
void ImageDialog::checkValues()
{
    if (nameLineEdit->text().isEmpty())
        (void) QMessageBox::information(this, tr("No Image Name"),
            tr("Please supply a name for the image."), QMessageBox::Cancel);
    else
        accept();
}
This custom slot does the minimum necessary to ensure that the data entered by the user is valid - it only accepts the input if a name was given for the image.
Although it is easy to implement a custom slot in the dialog and connect it in the constructor, we could instead use
QMetaObject
's auto-connection facilities to connect the
OK
button's clicked() signal to a slot in our subclass.
uic
automatically generates code in the dialog's
setupUi()
function to do this, so we only need to declare and implement a slot with a name that follows a standard convention:
void on_<object name>_<signal name>(<signal parameters>);
Using this convention, we can define and implement a slot that responds to mouse clicks on the OK 按钮:
class ImageDialog : public QDialog, private Ui::ImageDialog
{
    Q_OBJECT
public:
    ImageDialog(QWidget *parent = 0);
private slots:
    void on_okButton_clicked();
};
Another example of automatic signal and slot connection would be the
文本查找器
采用其
on_findButton_clicked()
槽。
使用 QMetaObject 系统以启用信号和槽连接:
QMetaObject::connectSlotsByName(this);
This enables us to implement the slot, as shown below:
void TextFinder::on_findButton_clicked()
{
    QString searchString = ui_lineEdit->text();
    QTextDocument *document = ui_textEdit->document();
    bool found = false;
    // undo previous change (if any)
    document->undo();
    if (searchString.isEmpty()) {
        QMessageBox::information(this, tr("Empty Search Field"),
                                 tr("The search field is empty. "
                                    "Please enter a word and click Find."));
    } else {
        QTextCursor highlightCursor(document);
        QTextCursor cursor(document);
        cursor.beginEditBlock();
    ...
        cursor.endEditBlock();
        if (found == false) {
            QMessageBox::information(this, tr("Word Not Found"),
                                     tr("Sorry, the word cannot be found."));
        }
    }
}
Automatic connection of signals and slots provides both a standard naming convention and an explicit interface for widget designers to work to. By providing source code that implements a given interface, user interface designers can check that their designs actually work without having to write code themselves.