演示如何创建基本图形布局。
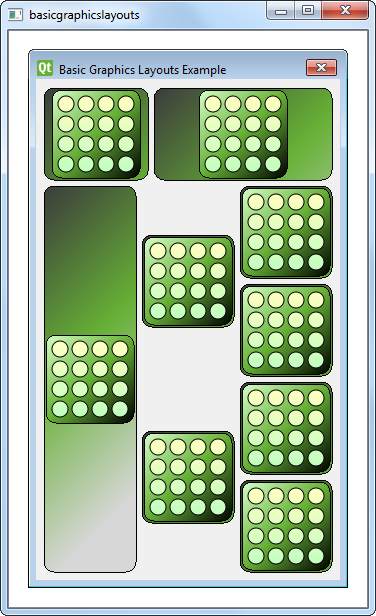
The Basic Graphics Layouts example shows how to use the layout classes in QGraphicsView : QGraphicsLinearLayout and QGraphicsGridLayout . In addition to that it shows how to write your own custom layout item.
The
Window
类是子类化的
QGraphicsWidget
. It has a constructor with a
QGraphicsWidget
parent
as its parameter.
class Window : public QGraphicsWidget {
    Q_OBJECT
public:
    Window(QGraphicsWidget *parent = 0);
};
The constructor of
Window
instantiates a
QGraphicsLinearLayout
对象,
windowLayout
, with vertical orientation. We instantiate another
QGraphicsLinearLayout
对象,
linear
, whose parent is
windowLayout
. Next, we create a
LayoutItem
对象,
item
and add it to
linear
采用
addItem()
function. We also provide
item
采用
stretchFactor
.
    QGraphicsLinearLayout *windowLayout = new QGraphicsLinearLayout(Qt::Vertical);
    QGraphicsLinearLayout *linear = new QGraphicsLinearLayout(windowLayout);
    LayoutItem *item = new LayoutItem;
    linear->addItem(item);
    linear->setStretchFactor(item, 1);
We repeat the process:
LayoutItem
,
linear
,和
    item = new LayoutItem;
    linear->addItem(item);
    linear->setStretchFactor(item, 3);
    windowLayout->addItem(linear);
We then add
linear
to
windowLayout
, nesting two
QGraphicsLinearLayout
objects. Apart from the
QGraphicsLinearLayout
, we also use a
QGraphicsGridLayout
对象,
grid
, which is a 4x3 grid with some cells spanning to other rows.
We create seven
LayoutItem
objects and place them into
grid
采用
addItem()
function as shown in the code snippet below:
    QGraphicsGridLayout *grid = new QGraphicsGridLayout(windowLayout);
    item = new LayoutItem;
    grid->addItem(item, 0, 0, 4, 1);
    item = new LayoutItem;
    item->setMaximumHeight(item->minimumHeight());
    grid->addItem(item, 0, 1, 2, 1, Qt::AlignVCenter);
    item = new LayoutItem;
    item->setMaximumHeight(item->minimumHeight());
    grid->addItem(item, 2, 1, 2, 1, Qt::AlignVCenter);
    item = new LayoutItem;
    grid->addItem(item, 0, 2);
    item = new LayoutItem;
    grid->addItem(item, 1, 2);
    item = new LayoutItem;
    grid->addItem(item, 2, 2);
    item = new LayoutItem;
    grid->addItem(item, 3, 2);
    windowLayout->addItem(grid);
The first item we add to
grid
is placed in the top left cell, spanning four rows. The next two items are placed in the second column, and they span two rows. Each item's
maximumHeight()
and
minimumHeight()
are set to be equal so that they do not expand vertically. As a result, these items will not fit vertically in their cells. So, we specify that they should be vertically aligned in the center of the cell using
Qt::AlignVCenter
.
最后,
grid
itself is added to
windowLayout
。不像
QGridLayout::addItem
(),
QGraphicsGridLayout::addItem
() requires a row and a column for its argument, specifying which cell the item should be positioned in. Also, if the
rowSpan
and
columnSpan
arguments are omitted, they will default to 1.
Note that we do not specify a parent for each
LayoutItem
that we construct, as all these items will be added to
windowLayout
. When we add an item to a layout, it will be automatically reparented to the widget on which the layout is installed.
    setLayout(windowLayout);
    setWindowTitle(tr("Basic Graphics Layouts Example"));
Now that we have set up
grid
and added it to
windowLayout
, we install
windowLayout
onto the window object using
QGraphicsWidget::setLayout
() and we set the window title.
The
LayoutItem
类是子类化的
QGraphicsLayoutItem
and
QGraphicsItem
. It has a constructor, a destructor, and some required reimplementations. Since it inherits
QGraphicsLayoutItem
it must reimplement {
QGraphicsLayoutItem::setGeometry
()}{setGeometry()} and {
QGraphicsLayoutItem::sizeHint
()}{sizeHint()}. In addition to that it inherits
QGraphicsItem
, so it must reimplement {
QGraphicsItem::boundingRect
()}{boundingRect()} and {
QGraphicsItem::paint
()}{paint()}.
class LayoutItem : public QGraphicsLayoutItem, public QGraphicsItem
{
public:
    LayoutItem(QGraphicsItem *parent = 0);
    ~LayoutItem();
    // Inherited from QGraphicsLayoutItem
    void setGeometry(const QRectF &geom) override;
    QSizeF sizeHint(Qt::SizeHint which, const QSizeF &constraint = QSizeF()) const override;
    // Inherited from QGraphicsItem
    QRectF boundingRect() const override;
    void paint(QPainter *painter, const QStyleOptionGraphicsItem *option, QWidget *widget = 0) override;
private:
    QPixmap *m_pix;
};
The
LayoutItem
class also has a private instance of
QPixmap
,
m_pix
.
在
LayoutItem
's constructor,
m_pix
is instantiated and the
block.png
image is loaded into it.
LayoutItem::LayoutItem(QGraphicsItem *parent/* = 0*/)
    : QGraphicsLayoutItem(), QGraphicsItem(parent)
{
    m_pix = new QPixmap(QLatin1String(":/images/block.png"));
    setGraphicsItem(this);
}
使用 Q_UNUSED () macro to prevent the compiler from generating warnings regarding unused parameters.
void LayoutItem::paint(QPainter *painter,
    const QStyleOptionGraphicsItem *option, QWidget *widget /*= 0*/)
{
    Q_UNUSED(widget);
    Q_UNUSED(option);
    QRectF frame(QPointF(0,0), geometry().size());
    qreal w = m_pix->width();
    qreal h = m_pix->height();
    QGradientStops stops;
The idea behind the
paint()
function is to paint the background rect then paint a rect around the pixmap.
    // paint a background rect (with gradient)
    QLinearGradient gradient(frame.topLeft(), frame.topLeft() + QPointF(200,200));
    stops << QGradientStop(0.0, QColor(60, 60,  60));
    stops << QGradientStop(frame.height() / 2 / frame.height(), QColor(102, 176, 54));
    //stops << QGradientStop(((frame.height() + h)/2 )/frame.height(), QColor(157, 195,  55));
    stops << QGradientStop(1.0, QColor(215, 215, 215));
    gradient.setStops(stops);
    painter->setBrush(QBrush(gradient));
    painter->drawRoundedRect(frame, 10.0, 10.0);
    // paint a rect around the pixmap (with gradient)
    QPointF pixpos = frame.center() - (QPointF(w, h) / 2);
    QRectF innerFrame(pixpos, QSizeF(w, h));
    innerFrame.adjust(-4, -4, 4, 4);
    gradient.setStart(innerFrame.topLeft());
    gradient.setFinalStop(innerFrame.bottomRight());
    stops.clear();
    stops << QGradientStop(0.0, QColor(215, 255, 200));
    stops << QGradientStop(0.5, QColor(102, 176, 54));
    stops << QGradientStop(1.0, QColor(0, 0,  0));
    gradient.setStops(stops);
    painter->setBrush(QBrush(gradient));
    painter->drawRoundedRect(innerFrame, 10.0, 10.0);
    painter->drawPixmap(pixpos, *m_pix);
}
The reimplementation of boundingRect() will set the top left corner at (0,0), and the size of it will be the size of the layout items geometry() . This is the area that we paint within.
QRectF LayoutItem::boundingRect() const
{
    return QRectF(QPointF(0,0), geometry().size());
}
The reimplementation of
setGeometry()
simply calls its baseclass implementation. However, since this will change the boundingRect we must also call
prepareGeometryChange()
. Finally, we move the item according to
geom.topLeft()
.
void LayoutItem::setGeometry(const QRectF &geom)
{
    prepareGeometryChange();
    QGraphicsLayoutItem::setGeometry(geom);
    setPos(geom.topLeft());
}
Since we don't want the size of the item to be smaller than the pixmap, we must make sure that we return a size hint that is larger than
m_pix
. We also add some extra space around for borders that we will paint later. Alternatively, you could scale the pixmap to prevent the item from becoming smaller than the pixmap. The preferred size is the same as the minimum size hint, while we set maximum to be a large value
QSizeF LayoutItem::sizeHint(Qt::SizeHint which, const QSizeF &constraint) const
{
    switch (which) {
    case Qt::MinimumSize:
    case Qt::PreferredSize:
        // Do not allow a size smaller than the pixmap with two frames around it.
        return m_pix->size() + QSize(12, 12);
    case Qt::MaximumSize:
        return QSizeF(1000,1000);
    default:
        break;
    }
    return constraint;
}
文件:
图像: