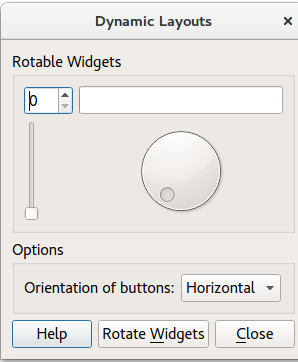
Shows how to re-orient widgets in running applications.
Dynamic Layouts
implements dynamically placed widgets within running applications. The widget placement depends on whether
Horizontal
or
Vertical
is chosen.
更多信息,拜访 布局管理 页面。
To begin with, the application creates the UI components by calling the following methods:
It then adds the UI components to a
GridLayout
(
mainLayout
).
最后,
Dialog::rotateWidgets()
被调用。
    createOptionsGroupBox();
    createButtonBox();
    mainLayout = new QGridLayout;
    mainLayout->addWidget(rotatableGroupBox, 0, 0);
    mainLayout->addWidget(optionsGroupBox, 1, 0);
    mainLayout->addWidget(buttonBox, 2, 0);
    setLayout(mainLayout);
    mainLayout->setSizeConstraint(QLayout::SetMinimumSize);
    setWindowTitle(tr("Dynamic Layouts"));
The
createRotatableGroupBox()
method creates a rotatable group box, then adds a series of widgets:
It goes on to add signals and slots to each widget, and assigns a QGridLayout called rotatableLayout .
void Dialog::createRotatableGroupBox()
{
    rotatableGroupBox = new QGroupBox(tr("Rotatable Widgets"));
    rotatableWidgets.enqueue(new QSpinBox);
    rotatableWidgets.enqueue(new QSlider);
    rotatableWidgets.enqueue(new QDial);
    rotatableWidgets.enqueue(new QProgressBar);
    int n = rotatableWidgets.count();
    for (int i = 0; i < n; ++i) {
        connect(rotatableWidgets[i], SIGNAL(valueChanged(int)),
                rotatableWidgets[(i + 1) % n], SLOT(setValue(int)));
    }
    rotatableLayout = new QGridLayout;
    rotatableGroupBox->setLayout(rotatableLayout);
    rotateWidgets();
}
createOptionsGroupBox()
creates the following widgets:
optionsGroupBox
buttonsOrientationLabel
buttonsOrientationComboBox
. The orientation of the ComboBox is either
horizontal
(default value) or
vertical
. These two values are added during the startup of the application. It is not possible to leave the option empty.
void Dialog::createOptionsGroupBox()
{
    optionsGroupBox = new QGroupBox(tr("Options"));
    buttonsOrientationLabel = new QLabel(tr("Orientation of buttons:"));
    buttonsOrientationComboBox = new QComboBox;
    buttonsOrientationComboBox->addItem(tr("Horizontal"), Qt::Horizontal);
    buttonsOrientationComboBox->addItem(tr("Vertical"), Qt::Vertical);
    connect(buttonsOrientationComboBox,
            QOverload<int>::of(&QComboBox::currentIndexChanged),
            this,
            &Dialog::buttonsOrientationChanged);
    optionsLayout = new QGridLayout;
    optionsLayout->addWidget(buttonsOrientationLabel, 0, 0);
    optionsLayout->addWidget(buttonsOrientationComboBox, 0, 1);
    optionsLayout->setColumnStretch(2, 1);
    optionsGroupBox->setLayout(optionsLayout);
}
createButtonBox() constructs a
QDialogButtonBox
called
buttonBox
to which are added a
closeButton
,
helpButton
和
rotateWidgetsButton
. It then assigns a signal and a slot to each button in
buttonBox
.
void Dialog::createButtonBox()
{
    buttonBox = new QDialogButtonBox;
    closeButton = buttonBox->addButton(QDialogButtonBox::Close);
    helpButton = buttonBox->addButton(QDialogButtonBox::Help);
    rotateWidgetsButton = buttonBox->addButton(tr("Rotate &Widgets"),
                                               QDialogButtonBox::ActionRole);
    connect(rotateWidgetsButton, &QPushButton::clicked, this, &Dialog::rotateWidgets);
    connect(closeButton, &QPushButton::clicked, this, &Dialog::close);
    connect(helpButton, &QPushButton::clicked, this, &Dialog::help);
}
Removes the current widgets and activates the next widget.
void Dialog::rotateWidgets()
{
    Q_ASSERT(rotatableWidgets.count() % 2 == 0);
    foreach (QWidget *widget, rotatableWidgets)
        rotatableLayout->removeWidget(widget);
    rotatableWidgets.enqueue(rotatableWidgets.dequeue());
    const int n = rotatableWidgets.count();
    for (int i = 0; i < n / 2; ++i) {
        rotatableLayout->addWidget(rotatableWidgets[n - i - 1], 0, i);
        rotatableLayout->addWidget(rotatableWidgets[i], 1, i);
    }
}
要运行范例从 Qt Creator ,打开 欢迎 模式,然后选择范例从 范例 。更多信息,拜访 构建和运行范例 .
文件: