The Declarative State Machine Framework provides types for creating and executing state graphs in QML. It is similar to the C++ State Machine framework based on Harel's Statecharts: A visual formalism for complex systems , which is also the basis for UML state diagrams. Like its C++ 搭档 , the framework provides an API and execution model based on SCXML (状态图表 XML) to embed the elements and semantics of statecharts in QML applications.
For user interfaces with multiple visual states, independent of the application's logical state, consider using QML States and Transitions.
These following QML types are provided by framework to create event-driven state machines:
| FinalState | 提供最终状态 |
| SignalTransition | Type provides a transition based on a Qt signal |
| HistoryState | Type provides a means of returning to a previously active substate |
| State | Provides a general-purpose state for StateMachine |
| StateMachine | Provides a hierarchical finite state machine |
| TimeoutTransition | Type provides a transition based on a timer |
警告: 若正试图 import 两者 QtQuick and QtQml . StateMachine in one single QML file, make sure to import QtQml . StateMachine last . This way, the 状态 type is provided by the Declarative State Machine Framework and not by QtQuick :
import QtQuick 2.0
import QtQml.StateMachine 1.0
StateMachine {
    State {
        // okay, is of type QtQml.StateMachine.State
    }
}
Alternatively, you can import QtQml . StateMachine into a separate namespace to avoid any ambiguity with QtQuick 's 状态 item:
import QtQuick 2.0
import QtQml.StateMachine 1.0 as DSM
DSM.StateMachine {
    DSM.State {
        // ...
    }
}
To demonstrate the core functionality of the State Machine API, let's look at an example: A state machine with three states,
s1
,
s2
and
s3
. The state machine is controlled by a single Button; when the button is clicked, the machine transitions to another state. Initially, the state machine is in state
s1
. The following is a state chart showing the different states in our example.
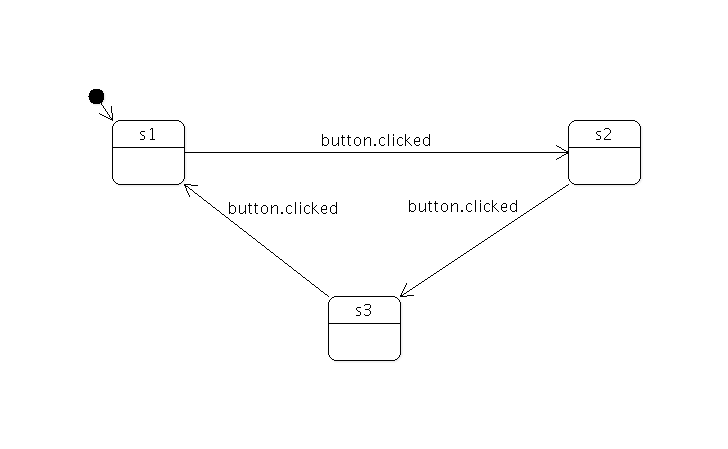
The following snippet shows the code needed to create such a state machine.
    Button {
        anchors.fill: parent
        id: button
        // change the button label to the active state id
        text: s1.active ? "s1" : s2.active ? "s2" : "s3"
    }
    StateMachine {
        id: stateMachine
        // set the initial state
        initialState: s1
        // start the state machine
        running: true
        State {
            id: s1
            // create a transition from s1 to s2 when the button is clicked
            SignalTransition {
                targetState: s2
                signal: button.clicked
            }
            // do something when the state enters/exits
            onEntered: console.log("s1 entered")
            onExited: console.log("s1 exited")
        }
        State {
            id: s2
            // create a transition from s2 to s3 when the button is clicked
            SignalTransition {
                targetState: s3
                signal: button.clicked
            }
            // do something when the state enters/exits
            onEntered: console.log("s2 entered")
            onExited: console.log("s2 exited")
        }
        State {
            id: s3
            // create a transition from s3 to s1 when the button is clicked
            SignalTransition {
                targetState: s1
                signal: button.clicked
            }
            // do something when the state enters/exits
            onEntered: console.log("s3 entered")
            onExited: console.log("s3 exited")
        }
    }
The state machine runs asynchronously to become part of your application's event loop.
The state machine defined in the previous section never finishes. In order for a state machine to be able to finish, it needs to have a top-level final 状态 ( FinalState object). When the state machine enters the top-level final state, the machine emits the finished signal and halts.
All you need to do to introduce a final state in the graph is create a FinalState object and use it as the target of one or more transitions.
Assume we wanted the user to be able to quit the application at any time by clicking a Quit button. In order to achieve this, we need to create a final state and make it the target of a transition associated with the Quit button's clicked() signal. We could add a transition for each state; however, this seems redundant and one would also have to remember to add such a transition from every new state that is added in the future.
We can achieve the same behavior (namely that clicking the Quit button quits the state machine, regardless of which state the state machine is in) by grouping states
s1
,
s2
and
s3
. This is done by creating a new top-level state and making the three original states children of the new state. The following diagram shows the new state machine.
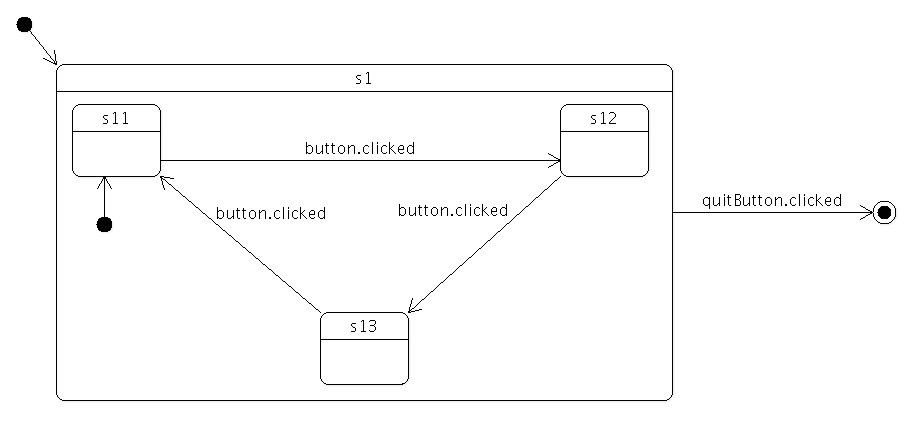
The three original states have been renamed
s11
,
s12
and
s13
to reflect that they are now childrens of the new top-level state,
s1
. Child states implicitly inherit the transitions of their parent state. This means it is now sufficient to add a single transition from
s1
to the final state,
s2
. New states added to
s1
will automatically inherit this transition.
All that's needed to group states is to specify the proper parent when the state is created. You also need to specify which of the child states is the initial one (the child state the state machine should enter when the parent state is the target of a transition).
    Row {
        anchors.fill: parent
        spacing: 2
        Button {
            id: button
            // change the button label to the active state id
            text: s11.active ? "s11" : s12.active ? "s12" : "s13"
        }
        Button {
            id: quitButton
            text: "quit"
        }
    }
    StateMachine {
        id: stateMachine
        // set the initial state
        initialState: s1
        // start the state machine
        running: true
        State {
            id: s1
            // set the initial state
            initialState: s11
            // create a transition from s1 to s2 when the button is clicked
            SignalTransition {
                targetState: s2
                signal: quitButton.clicked
            }
            // do something when the state enters/exits
            onEntered: console.log("s1 entered")
            onExited: console.log("s1 exited")
            State {
                id: s11
                // create a transition from s11 to s12 when the button is clicked
                SignalTransition {
                    targetState: s12
                    signal: button.clicked
                }
                // do something when the state enters/exits
                onEntered: console.log("s11 entered")
                onExited: console.log("s11 exited")
            }
            State {
                id: s12
                // create a transition from s12 to s13 when the button is clicked
                SignalTransition {
                    targetState: s13
                    signal: button.clicked
                }
                // do something when the state enters/exits
                onEntered: console.log("s12 entered")
                onExited: console.log("s12 exited")
            }
            State {
                id: s13
                // create a transition from s13 to s11 when the button is clicked
                SignalTransition {
                    targetState: s11
                    signal: button.clicked
                }
                // do something when the state enters/exits
                onEntered: console.log("s13 entered")
                onExited: console.log("s13 exited")
            }
        }
        FinalState {
            id: s2
            onEntered: console.log("s2 entered")
            onExited: console.log("s2 exited")
        }
        onFinished: Qt.quit()
    }
In this case we want the application to quit when the state machine is finished, so the machine's finished() signal is connected to the application's quit() 槽。
A child state can override an inherited transition. For example, the following code adds a transition that effectively causes the Quit button to be ignored when the state machine is in state,
s12
.
            State {
                id: s12
                // create a transition from s12 to s13 when the button is clicked
                SignalTransition {
                    targetState: s13
                    signal: button.clicked
                }
                // ignore Quit button when we are in state 12
                SignalTransition {
                    targetState: s12
                    signal: quitButton.clicked
                }
                // do something when the state enters/exits
                onEntered: console.log("s12 entered")
                onExited: console.log("s12 exited")
            }
A transition can have any state as its target irrespective of where the target state is in the state hierarchy.
Imagine that we wanted to add an "interrupt" mechanism to the example discussed in the previous section; the user should be able to click a button to have the state machine perform some non-related task, after which the state machine should resume whatever it was doing before (i.e. return to the old state, which is one of the three states in this case).
Such behavior can easily be modeled using history states . A history state ( HistoryState object) is a pseudo-state that represents the child state that the parent state was in before it exited last.
A history state is created as a child of the state for which we wish to record the current child state; when the state machine detects the presence of such a state at runtime, it automatically records the current (real) child state when the parent state exits. A transition to the history state is in fact a transition to the child state that the state machine had previously saved; the state machine automatically "forwards" the transition to the real child state.
The following diagram shows the state machine after the interrupt mechanism has been added.
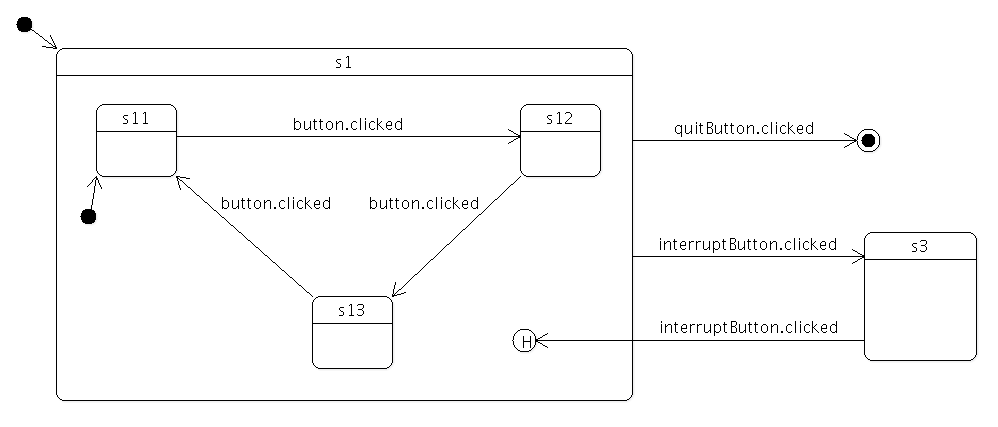
The following code shows how it can be implemented; in this example we simply display a message box when
s3
is entered, then immediately return to the previous child state of
s1
via the history state.
    Row {
        anchors.fill: parent
        spacing: 2
        Button {
            id: button
            // change the button label to the active state id
            text: s11.active ? "s11" : s12.active ? "s12" :  s13.active ? "s13" : "s3"
        }
        Button {
            id: interruptButton
            text: s1.active ? "Interrupt" : "Resume"
        }
        Button {
            id: quitButton
            text: "quit"
        }
    }
    StateMachine {
        id: stateMachine
        // set the initial state
        initialState: s1
        // start the state machine
        running: true
        State {
            id: s1
            // set the initial state
            initialState: s11
            // create a transition from s1 to s2 when the button is clicked
            SignalTransition {
                targetState: s2
                signal: quitButton.clicked
            }
            // do something when the state enters/exits
            onEntered: console.log("s1 entered")
            onExited: console.log("s1 exited")
            State {
                id: s11
                // create a transition from s1 to s2 when the button is clicked
                SignalTransition {
                    targetState: s12
                    signal: button.clicked
                }
                // do something when the state enters/exits
                onEntered: console.log("s11 entered")
                onExited: console.log("s11 exited")
            }
            State {
                id: s12
                // create a transition from s2 to s3 when the button is clicked
                SignalTransition {
                    targetState: s13
                    signal: button.clicked
                }
                // do something when the state enters/exits
                onEntered: console.log("s12 entered")
                onExited: console.log("s12 exited")
            }
            State {
                id: s13
                // create a transition from s3 to s1 when the button is clicked
                SignalTransition {
                    targetState: s1
                    signal: button.clicked
                }
                // do something when the state enters/exits
                onEntered: console.log("s13 entered")
                onExited: console.log("s13 exited")
            }
            // create a transition from s1 to s3 when the button is clicked
            SignalTransition {
                targetState: s3
                signal: interruptButton.clicked
            }
            HistoryState {
                id: s1h
            }
        }
        FinalState {
            id: s2
            onEntered: console.log("s2 entered")
            onExited: console.log("s2 exited")
        }
        State {
            id: s3
            SignalTransition {
                targetState: s1h
                signal: interruptButton.clicked
            }
            // do something when the state enters/exits
            onEntered: console.log("s3 entered")
            onExited: console.log("s3 exited")
        }
        onFinished: Qt.quit()
    }
Assume that you wanted to model a set of mutually exclusive properties of a car in a single state machine. Let's say the properties we are interested in are Clean vs Dirty, and Moving vs Not moving. It would take four mutually exclusive states and eight transitions to represent the states and freely move between all possible combinations as shown in the following state chart.
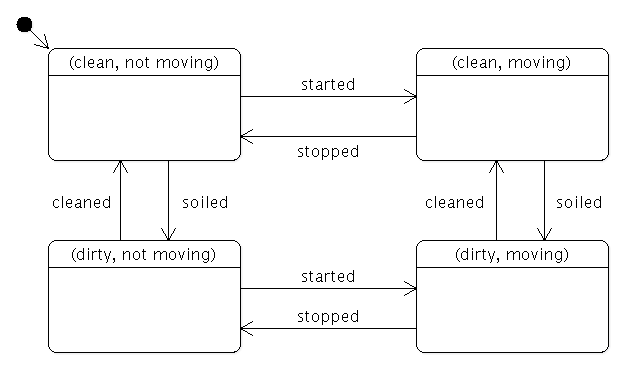
If we added a third property (say, Red vs Blue), the total number of states would double, to eight; and if we added a fourth property (say, Enclosed vs Convertible), the total number of states would double again, to 16.
This exponential increase can be reduced using parallel states, which enables linear growth in the number of states and transitions as we add more properties. Furthermore, states can be added to or removed from the parallel state without affecting any of their sibling states. The following state chart shows the different paralles states for the car example.
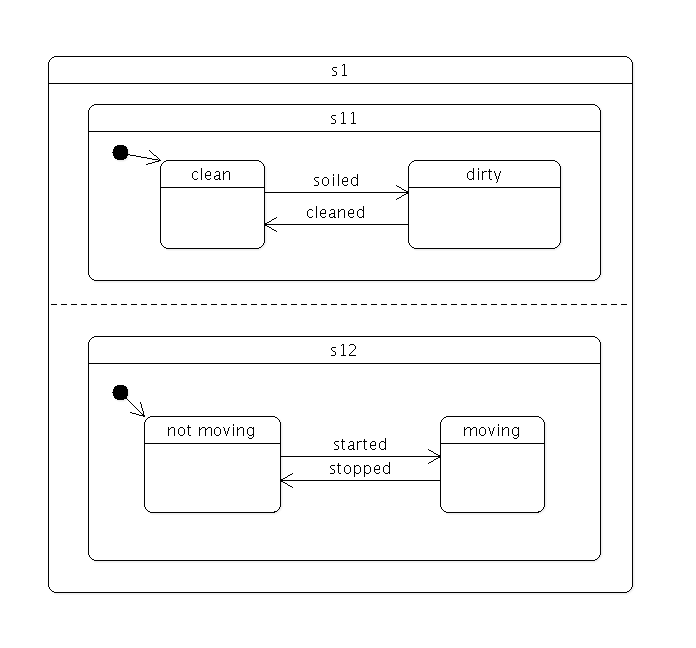
To create a parallel state group, set childMode to QState .ParallelStates.
State {
    id: s1
    childMode: QState.ParallelStates
    State {
        id: s11
    }
    State {
        id: s12
    }
}
When a parallel state group is entered, all its child states will be simultaneously entered. Transitions within the individual child states operate normally. However, any of the child states may take a transition which exits the parent state. When this happens, the parent state and all of its child states are exited.
The parallelism in the State Machine framework follows an interleaved semantics. All parallel operations will be executed in a single, atomic step of the event processing, so no event can interrupt the parallel operations. However, events will still be processed sequentially, as the machine itself is single threaded. For example, consider the situation where there are two transitions that exit the same parallel state group, and their conditions become true simultaneously. In this case, the event that is processed last of the two will not have any effect.
A child state can be final (a
FinalState
object); when a final child state is entered, the parent state emits the
State::finished
signal. The following diagram shows a composite state
s1
which does some processing before entering a final state:
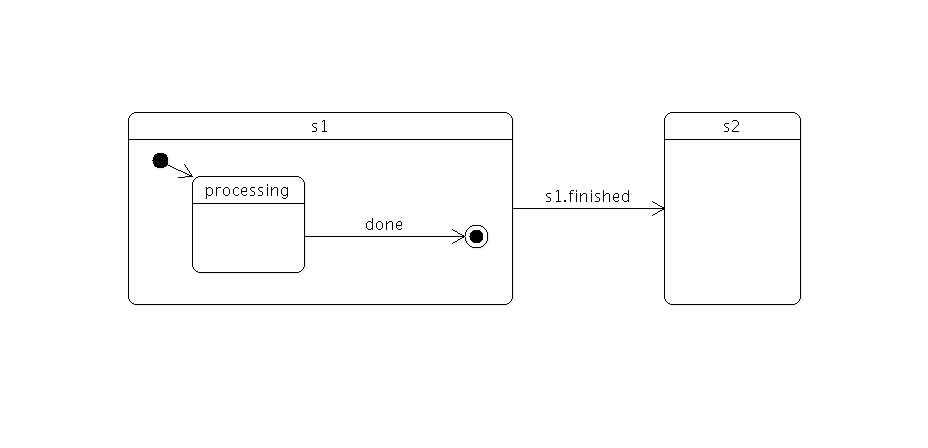
当
s1
's final state is entered,
s1
will automatically emit
finished
. We use a signal transition to cause this event to trigger a state change:
State {
    id: s1
    SignalTransition {
        targetState: s2
        signal: s1.finished
    }
}
Using final states in composite states is useful when you want to hide the internal details of a composite state. The outside world should be able to enter the state and get a notification when the state has completed its work, without the need to know the internal details. This is a very powerful abstraction and encapsulation mechanism when building complex (deeply nested) state machines. (In the above example, you could of course create a transition directly from
s1
's
done
state rather than relying on
s1
's finished() signal, but with the consequence that implementation details of
s1
are exposed and depended on).
For parallel state groups, the State::finished 信号发射当 all the child states have entered final states.
A transition need not have a target state. A transition without a target can be triggered the same way as any other transition; the difference is that it doesn't cause any state changes. This allows you to react to a signal or event when your machine is in a certain state, without having to leave that state. For example:
Button {
    id: button
    text: "button"
    StateMachine {
        id: stateMachine
        initialState: s1
        running: true
        State {
            id: s1
            SignalTransition {
                signal: button.clicked
                onTriggered: console.log("button pressed")
            }
        }
    }
}
The "button pressed" message will be displayed each time the button is clicked, but the state machine will remain in its current state (s1). If the target state were explicitly set to s1, s1 would be exited and re-entered each time (the QAbstractState::entered and QAbstractState::exited 信号会被发射)。