简单 演示如何在 Qt 3D 渲染场景。
要运行范例从 Qt Creator ,打开 欢迎 模式,然后选择范例从 范例 。更多信息,拜访 构建和运行范例 .
设置场景在 main.cpp 文件。
To be able to use the classes and functions in the Q3D Core, Q3D Render, Qt 3D Input, and Qt 3D Extras modules, we must include the classes:
#include <Qt3DCore/QEntity>
#include <Qt3DRender/QCamera>
#include <Qt3DRender/QCameraLens>
#include <Qt3DCore/QTransform>
#include <Qt3DCore/QAspectEngine>
#include <Qt3DInput/QInputAspect>
#include <Qt3DRender/QRenderAspect>
#include <Qt3DExtras/QForwardRenderer>
#include <Qt3DExtras/QPhongMaterial>
#include <Qt3DExtras/QCylinderMesh>
#include <Qt3DExtras/QSphereMesh>
#include <Qt3DExtras/QTorusMesh>
First, we set up the scene and specify its root entity:
Qt3DCore::QEntity *createScene()
{
    Qt3DCore::QEntity *rootEntity = new Qt3DCore::QEntity;
We specify the material to use for Phong rendering:
Qt3DRender::QMaterial *material = new Qt3DExtras::QPhongMaterial(rootEntity);
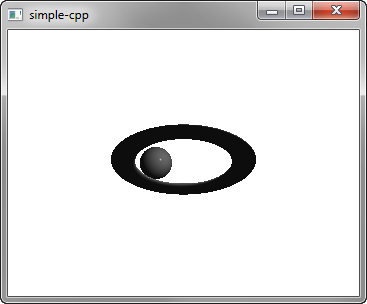
The root entity is just an empty shell and its behavior is defined by the components that it references. We specify the torus entity and its mesh, transform, and material components:
    Qt3DCore::QEntity *torusEntity = new Qt3DCore::QEntity(rootEntity);
    Qt3DExtras::QTorusMesh *torusMesh = new Qt3DExtras::QTorusMesh;
    torusMesh->setRadius(5);
    torusMesh->setMinorRadius(1);
    torusMesh->setRings(100);
    torusMesh->setSlices(20);
    Qt3DCore::QTransform *torusTransform = new Qt3DCore::QTransform;
    torusTransform->setScale3D(QVector3D(1.5, 1, 0.5));
    torusTransform->setRotation(QQuaternion::fromAxisAndAngle(QVector3D(1, 0, 0), 45.0f));
    torusEntity->addComponent(torusMesh);
    torusEntity->addComponent(torusTransform);
    torusEntity->addComponent(material);
We also specify a sphere entity and its components:
    Qt3DCore::QEntity *sphereEntity = new Qt3DCore::QEntity(rootEntity);
    Qt3DExtras::QSphereMesh *sphereMesh = new Qt3DExtras::QSphereMesh;
    sphereMesh->setRadius(3);
    Qt3DCore::QTransform *sphereTransform = new Qt3DCore::QTransform;
    OrbitTransformController *controller = new OrbitTransformController(sphereTransform);
    controller->setTarget(sphereTransform);
    controller->setRadius(20.0f);
    QPropertyAnimation *sphereRotateTransformAnimation = new QPropertyAnimation(sphereTransform);
    sphereRotateTransformAnimation->setTargetObject(controller);
    sphereRotateTransformAnimation->setPropertyName("angle");
    sphereRotateTransformAnimation->setStartValue(QVariant::fromValue(0));
    sphereRotateTransformAnimation->setEndValue(QVariant::fromValue(360));
    sphereRotateTransformAnimation->setDuration(10000);
    sphereRotateTransformAnimation->setLoopCount(-1);
    sphereRotateTransformAnimation->start();
    sphereEntity->addComponent(sphereMesh);
    sphereEntity->addComponent(sphereTransform);
    sphereEntity->addComponent(material);
We use a property animation to animate the sphere transform.
Finally, we initialize a Qt GUI application that uses a Qt 3D window:
int main(int argc, char* argv[])
{
    QGuiApplication app(argc, argv);
    Qt3DExtras::Qt3DWindow view;
    Qt3DCore::QEntity *scene = createScene();
    // Camera
    Qt3DRender::QCamera *camera = view.camera();
    camera->lens()->setPerspectiveProjection(45.0f, 16.0f/9.0f, 0.1f, 1000.0f);
    camera->setPosition(QVector3D(0, 0, 40.0f));
    camera->setViewCenter(QVector3D(0, 0, 0));
    // For camera controls
    Qt3DExtras::QOrbitCameraController *camController = new Qt3DExtras::QOrbitCameraController(scene);
    camController->setLinearSpeed( 50.0f );
    camController->setLookSpeed( 180.0f );
    camController->setCamera(camera);
    view.setRootEntity(scene);
    view.show();
    return app.exec();
}
文件: