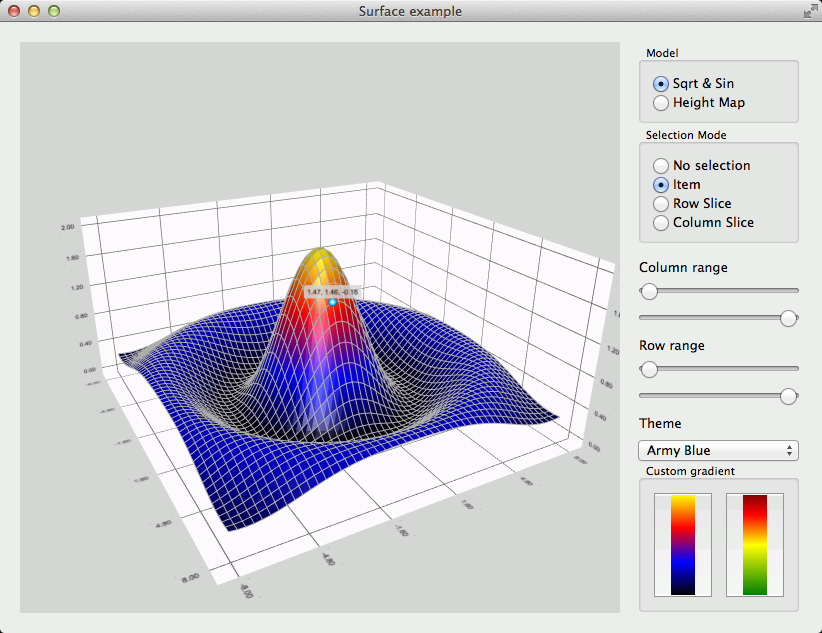
使用 Q3DSurface 在 Widget 应用程序。
The surface example shows how to make a simple 3D surface graph using Q3DSurface and combining the use of widgets for adjusting several adjustable qualities. This example demonstrates the following features:
For instructions about how to interact with the graph, see this page .

要运行范例从 Qt Creator ,打开 欢迎 模式,然后选择范例从 范例 。更多信息,拜访 构建和运行范例 .
首先,在
main.cpp
,创建
QApplication
,实例化
Q3DSurface
, and a window container for it:
QApplication app(argc, argv);
Q3DSurface *graph = new Q3DSurface();
QWidget *container = QWidget::createWindowContainer(graph);
The call to QWidget::createWindowContainer is required, as all data visualization graph classes ( Q3DBars , Q3DScatter ,和 Q3DSurface ) 继承 QWindow . Any class inheriting QWindow cannot be used as a widget any other way.
Then we'll create horizontal and vertical layouts. We'll add the graph with the container and the vertical layout into the horizontal one:
QWidget *widget = new QWidget;
QHBoxLayout *hLayout = new QHBoxLayout(widget);
QVBoxLayout *vLayout = new QVBoxLayout();
hLayout->addWidget(container, 1);
hLayout->addLayout(vLayout);
vLayout->setAlignment(Qt::AlignTop);
The rest of the code in
main.cpp
is creating control widgets for features in
Q3DSurface
. We have separated code for changing these features into
surfacegraph.cpp
and only connect signals from widgets into methods in
surfacegraph.cpp
. Next chapter explains more about using
Q3DSurface
.
First we instantiate a new QSurfaceDataProxy and attach it to a new QSurface3DSeries :
m_sqrtSinProxy = new QSurfaceDataProxy();
m_sqrtSinSeries = new QSurface3DSeries(m_sqrtSinProxy);
Then we fill the proxy with a simple square root and sine wave data. This is done by creating a new
QSurfaceDataArray
instance and adding
QSurfaceDataRow
elements to it. The created
QSurfaceDataArray
is set to be the data array for the
QSurfaceDataProxy
.
void SurfaceGraph::fillSqrtSinProxy()
{
    float stepX = (sampleMax - sampleMin) / float(sampleCountX - 1);
    float stepZ = (sampleMax - sampleMin) / float(sampleCountZ - 1);
    QSurfaceDataArray *dataArray = new QSurfaceDataArray;
    dataArray->reserve(sampleCountZ);
    for (int i = 0 ; i < sampleCountZ ; i++) {
        QSurfaceDataRow *newRow = new QSurfaceDataRow(sampleCountX);
        // Keep values within range bounds, since just adding step can cause minor drift due
        // to the rounding errors.
        float z = qMin(sampleMax, (i * stepZ + sampleMin));
        int index = 0;
        for (int j = 0; j < sampleCountX; j++) {
            float x = qMin(sampleMax, (j * stepX + sampleMin));
            float R = qSqrt(z * z + x * x) + 0.01f;
            float y = (qSin(R) / R + 0.24f) * 1.61f;
            (*newRow)[index++].setPosition(QVector3D(x, y, z));
        }
        *dataArray << newRow;
    }
    m_sqrtSinProxy->resetArray(dataArray);
}
The height map is created by instantiating a QHeightMapSurfaceDataProxy 采用 QImage containing the height data. The method QHeightMapSurfaceDataProxy::setValueRanges () is used to define the value range of the map. In our example the map is from imaginary position of 34.0° N - 40.0° N and 18.0° E - 24.0° E. These values are used to show and position the map to the axis.
QImage heightMapImage(":/maps/mountain");
m_heightMapProxy = new QHeightMapSurfaceDataProxy(heightMapImage);
m_heightMapSeries = new QSurface3DSeries(m_heightMapProxy);
m_heightMapSeries->setItemLabelFormat(QStringLiteral("(@xLabel, @zLabel): @yLabel"));
m_heightMapProxy->setValueRanges(34.0f, 40.0f, 18.0f, 24.0f);
For demonstrating different proxies this example has two radio buttons which the user can use to switch between the series. When the user selects the
Sqrt & Sin
radio button, the selected series is activated with the following code. First we set the decorative issues like enable the grid for the surface and select the flat shading mode. Next lines define the axis label format and value ranges. Automatic label rotation is set to improve label readability at low camera angles. Finally we make sure the correct series is added to the graph:
m_sqrtSinSeries->setDrawMode(QSurface3DSeries::DrawSurfaceAndWireframe);
m_sqrtSinSeries->setFlatShadingEnabled(true);
m_graph->axisX()->setLabelFormat("%.2f");
m_graph->axisZ()->setLabelFormat("%.2f");
m_graph->axisX()->setRange(sampleMin, sampleMax);
m_graph->axisY()->setRange(0.0f, 2.0f);
m_graph->axisZ()->setRange(sampleMin, sampleMax);
m_graph->axisX()->setLabelAutoRotation(30);
m_graph->axisY()->setLabelAutoRotation(90);
m_graph->axisZ()->setLabelAutoRotation(30);
m_graph->removeSeries(m_heightMapSeries);
m_graph->addSeries(m_sqrtSinSeries);
当
Height Map
radio button is activated, the following code sets the correct series active. The axis label format is set to show N and E letters and ranges are set to the imaginary coordinates. Auto adjusting Y-axis range is fine for our height map surface, so we ensure it is set.
m_heightMapSeries->setDrawMode(QSurface3DSeries::DrawSurface);
m_heightMapSeries->setFlatShadingEnabled(false);
m_graph->axisX()->setLabelFormat("%.1f N");
m_graph->axisZ()->setLabelFormat("%.1f E");
m_graph->axisX()->setRange(34.0f, 40.0f);
m_graph->axisY()->setAutoAdjustRange(true);
m_graph->axisZ()->setRange(18.0f, 24.0f);
m_graph->axisX()->setTitle(QStringLiteral("Latitude"));
m_graph->axisY()->setTitle(QStringLiteral("Height"));
m_graph->axisZ()->setTitle(QStringLiteral("Longitude"));
m_graph->removeSeries(m_sqrtSinSeries);
m_graph->addSeries(m_heightMapSeries);
Q3Dsurface supports three different selection modes. These are demonstrated in the example with radio buttons, which the user can use to activate a suitable selection mode. The following inline methods are connected to radio buttons to activate the selected mode.
void toggleModeNone() { m_graph->setSelectionMode(QAbstract3DGraph::SelectionNone); }
void toggleModeItem() { m_graph->setSelectionMode(QAbstract3DGraph::SelectionItem); }
void toggleModeSliceRow() { m_graph->setSelectionMode(QAbstract3DGraph::SelectionItemAndRow
                                                      | QAbstract3DGraph::SelectionSlice); }
void toggleModeSliceColumn() { m_graph->setSelectionMode(QAbstract3DGraph::SelectionItemAndColumn
                                                         | QAbstract3DGraph::SelectionSlice); }
The example has four slider controls for adjusting the min and max values for X and Z axis. When selecting the proxy these sliders are adjusted so that one step on the slider moves the range by one segment step:
// Reset range sliders for Sqrt&Sin
m_rangeMinX = sampleMin;
m_rangeMinZ = sampleMin;
m_stepX = (sampleMax - sampleMin) / float(sampleCountX - 1);
m_stepZ = (sampleMax - sampleMin) / float(sampleCountZ - 1);
m_axisMinSliderX->setMaximum(sampleCountX - 2);
m_axisMinSliderX->setValue(0);
m_axisMaxSliderX->setMaximum(sampleCountX - 1);
m_axisMaxSliderX->setValue(sampleCountX - 1);
m_axisMinSliderZ->setMaximum(sampleCountZ - 2);
m_axisMinSliderZ->setValue(0);
m_axisMaxSliderZ->setMaximum(sampleCountZ - 1);
m_axisMaxSliderZ->setValue(sampleCountZ - 1);
The ranges are set for the axes like this:
void SurfaceGraph::setAxisXRange(float min, float max)
{
    m_graph->axisX()->setRange(min, max);
}
void SurfaceGraph::setAxisZRange(float min, float max)
{
    m_graph->axisZ()->setRange(min, max);
}
Q3DSurface supports all the themes Qt Data Visualization has. The example has a pull down menu for selecting the theme. The following method is connected to the menu to activate the selected theme. The theme type is changed to another predefined theme, which overwrites all theme properties to predefined values:
void SurfaceGraph::changeTheme(int theme)
{
    m_graph->activeTheme()->setType(Q3DTheme::Theme(theme));
}
The example demonstrates the custom surface gradients with two push buttons. The gradient can be defined with QLinearGradient where the desired colors are set to positions. The following code shows how to create an example gradient and set it to the series. Note that you also need to change the color style to Q3DTheme::ColorStyleRangeGradient to actually use the gradient.
QLinearGradient gr;
gr.setColorAt(0.0, Qt::black);
gr.setColorAt(0.33, Qt::blue);
gr.setColorAt(0.67, Qt::red);
gr.setColorAt(1.0, Qt::yellow);
m_graph->seriesList().at(0)->setBaseGradient(gr);
m_graph->seriesList().at(0)->setColorStyle(Q3DTheme::ColorStyleRangeGradient);
文件:
图像: